Putty is great, open source SSH and Telnet client. It is totally free and has a ton of features available to the user.
PuTTY is definitely one of the preferred SSH clients out there! For the price, it cannot be beat!
PuTTY can be used to establish an SSH tunnel between the client machine and a remote machine. This can be used to transfer data, access systems privately and other myriads of uses.
What Is An SSH Tunnel?
Many people’s familiarity with SSH is for remote administrative access to a machine. Often, the use case is remote administrative access to a Linux machine, network hardware and other various appliances.
Lesser known uses of the SSH protocol is to establish an SSH tunnel. Similar to a VPN tunnel, an SSH tunnel can forward data and traffic to the server or appliance using the SSH protocol.
Unlike a VPN tunnel, however, SSH tunneling is port specific. It does not forward “all traffic” to or from the remote machine.
This tunnel can then be used to send traffic or data to and from specific TCP/UDP ports. It can go “both ways” allowing the client to access the server, as well as the server accessing the client.
SSH tunneling does require the remote device to support SSH. SSH tunneling is not a “universal feature” that can be used to establish communications with anything out there.
Creating A Temporary Local Port Forward With PuTTY
A local port forward will allow the client machine to send traffic to the remote machine over a specific TCP or UDP port. This is useful if you want to access a service, over SSH, on the remote machine.
If you have an existing SSH session open, you can establish an SSH tunnel to the remote machine. To do so, click on PuTTY’s task bar and select “Change Settings.”
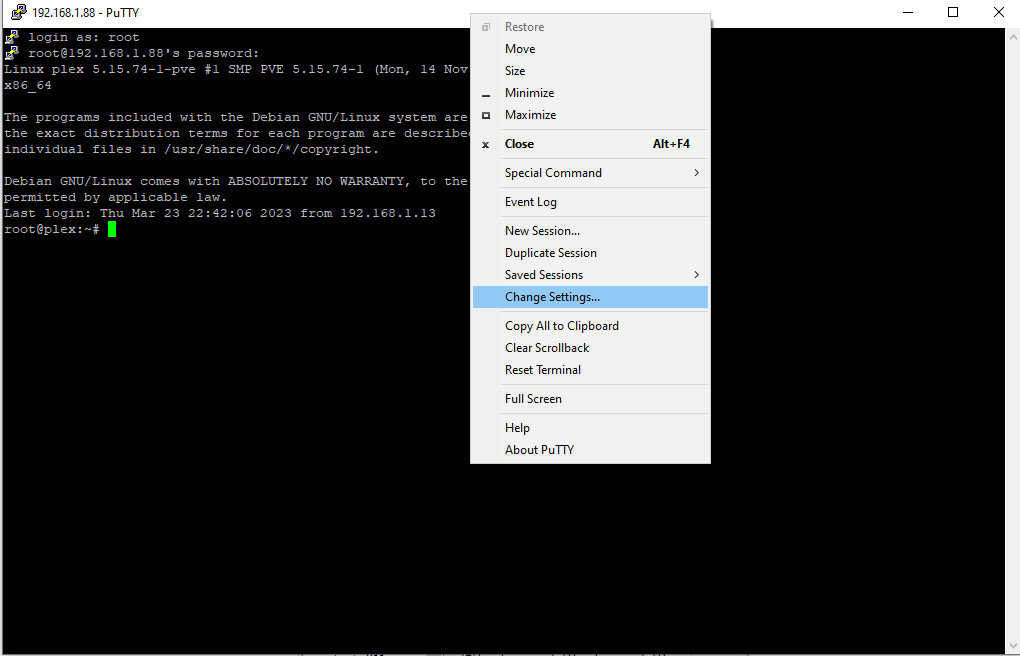
Once you get into settings, navigate to Connection -> SSH -> Tunnels. This is where you will establish the port forward.
The source port will be the port on the local machine (where PuTTY is installed) that is used to access the remote port. The destination is an IP address and the remote port that you will be connecting to.
For a local port forward, the “Local” radio button must be selected. You also have buttons available to isolate the traffic to IPv4 or IPv6, if desired.
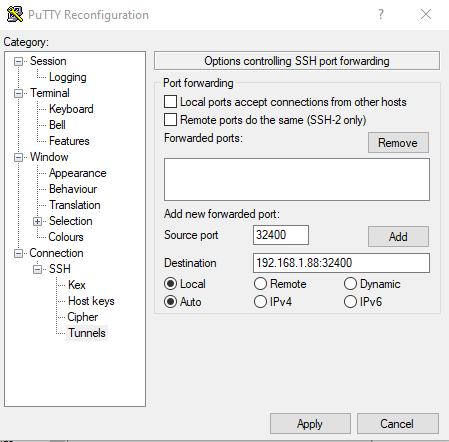
In this example, this will allow the local machine to access port 32400. The traffic will be forwarded to the remote machine, also on port 32400. The ports don’t “need” to be the same in all cases.
Once you are happy with the settings, click the Add button. This will add the local port forward into the “Forwarded Ports” section. Once you press Apply in the lower right, the SSH tunnel will be established with the remote machine.
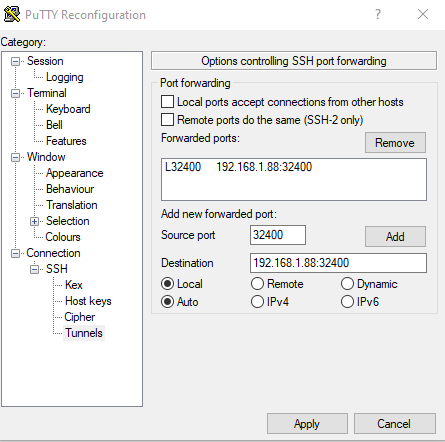
The local machine should now be able to access remote resources over the existing SSH session.
Creating A Temporary Remote Port Forward With PuTTY
A remote port forward will allow the remote machine to access the local machine over a specific TCP or UDP port. This is useful if you you need the remote machine to access local resources, such as TFTP, SFTP or other specific resources on the local machine.
If you have an existing SSH session open, you can establish an SSH tunnel to the remote machine. To do so, click on PuTTY’s task bar and select “Change Settings.”

Once you get into settings, navigate to Connection -> SSH -> Tunnels. This is where you will establish the remote port forward.
The source port will be the port on the remote machine (e.g. your server) that is used to access the local port (i.e. the machine where PuTTY is installed). The destination is an IP address of the machine where the PuTTY client is installed.
For a remote port forward, the “Remote” radio button must be selected. You also have buttons available to isolate the traffic to IPv4 or IPv6, if desired.
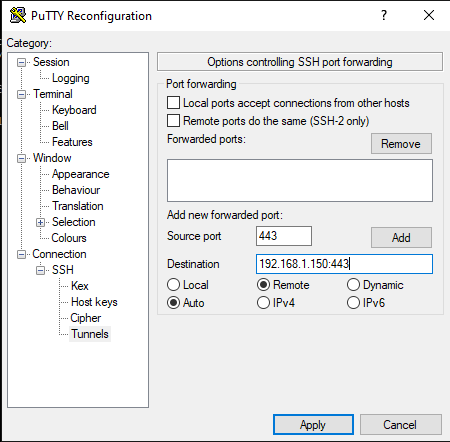
In this example, this will allow the remote machine to access port 443. The traffic will be forwarded to the local machine, also on port 443. The ports don’t “need” to be the same in all cases.
Once you are happy with the settings, click the Add button. This will add the remote port forward into the “Forwarded Ports” section. Once you press Apply in the lower right, the SSH tunnel will be established with the remote machine.
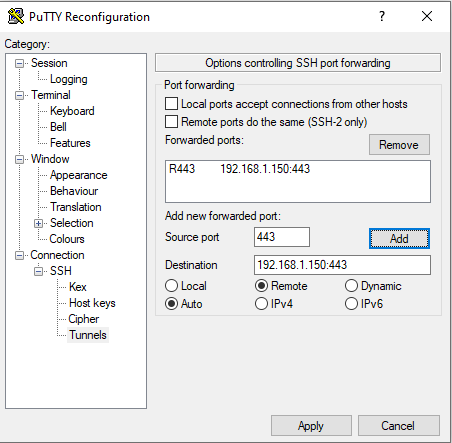
The remote machine should now be able to access local resources over the existing SSH session.
Creating Permanent Local & Remote Port Forwards With PuTTY
If your situation requires you to establish either a local or remote port forward every single time you connect to the remote machine, you can save these tunnels into a saved profile.
It should be noted that by “permanent” we do mean only when the SSH is actually established. This will not take the place of something like a “site-to-site VPN” that allows permanent access. If the SSH session is broken, so will the tunnel.
PuTTY can save various connection profiles, making repetitive access to a remote machine as simple as loading that profile. This is done in the “Session” tab. Typically, the Host Name and port are filled out.
Put your desired connection name in the “Saved Sessions” field and click the save button. This will then allow you to load this session (using the Load button) any time you want to connect to this machine.
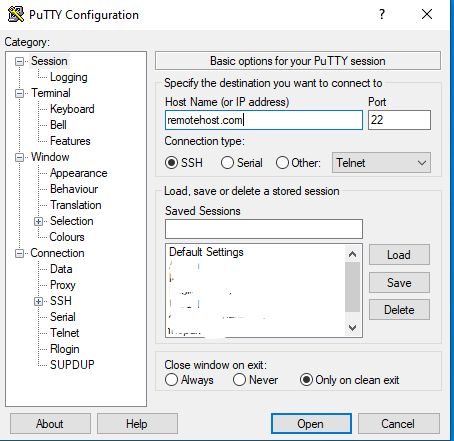
To save an SSH tunnel into this profile, navigate to Connection -> SSH -> Tunnels.
Follow the “Local” or “Remote” forwarding instructions above to establish your SSH tunnel port forwarding. When finished, be sure to go back to the “Session” tab and select “Save.”
This will make the profile repeatably establish the desired SSH port forwarding every time you connect to the remote machine.
This is helpful for remote access scenarios and other situations where you consistently want the port forwarding to be present upon SSH connection.
Wrapping Up With PuTTY SSH Tunnels
That’s the basics of SSH port forwarding and establishing SSH tunnels using PuTTY.
Should you have any thoughts, comments or other things to add, feel free to add a comment down below!